Do you know that awkward moment when you’re so inspired to draw something… Anything… But it just won’t look right? Who am I kidding? Of course you do! All growing artists have gone through this and sometimes experienced artists still do!
You’ll recognize that moment when you start questioning your entire existence. Where do legs even go? Why does this arm look broken? Can’t I just hide hands behind the back so that I won’t have to draw them?
I wish I could let you go your merry way and tell you not to worry about that. But then you’d blame me once people start playing ‘find the broken bone’ with your artwork! And, trust me, it’s not as entertaining for the artist as it is for the viewers! 😉 I should know… The good thing is that you can avoid this by doing a basic figure drawing before you start detailing everything!
Although I’ve never really liked this technique and barely used it when I first started learning to draw, I have to admit it’s very useful. I could have improved a lot faster and avoided many simple mistakes if I had just taken a few extra seconds to create the basic figure outline of my characters.
But I was lazy. I wanted to dive into the fun part straightaway. Not realizing that it would be very hard to get everything right and fix my mistakes later on.
Don’t be like me. Don’t slow your own progress down out of sheer laziness! Drawing the basic figure of your characters won’t take you long and the benefits will be worth it!
So, grab a pencil and let’s do some figure drawing!
Why is this basic figure drawing step so important?
In this tutorial, you’ll learn how to make a preliminary sketch or outline of your character’s body using simple geometrical shapes. Reducing the complexity of the body to simple shapes will allow you to:
- Draw different poses with ease
- Avoid plenty of anatomical issues
- Spend more time drawing and less guessing where each part of the body goes in that crazy pose you decided to do!

Creating a figure drawing step by step
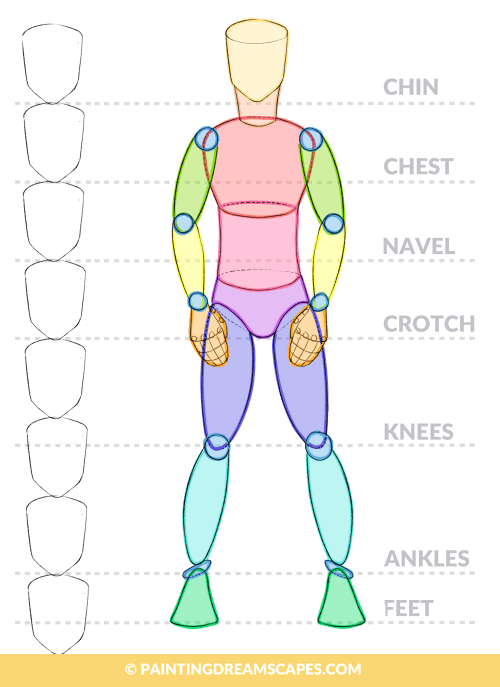
The body is usually 7 to 7 and a half heads tall. This remains constant regardless of the height of your character, because it’s their own head size that will determine their height.
In other words, shorter figures have smaller heads, and taller figures have larger heads. With a proportion equal to the total height of the body being 7 to 7 and a half times the size of the head.
DRAWING THE HEAD
Once you’ve drawn your character’s head, measure it and draw (or visualize) 7 and a half heads of the same size to act as your guide while you draw the body. I usually draw an ellipse at the top and then two lines on the sides of the head that merge together to form the jaw and the chin.
DRAWING THE NECK
Now, draw the neck of your character. The neck is usually the same width as the lower part of the head and jaw. However, if you’re looking for a more stylized style, you can draw slightly thinner necks, especially for female figures.
DRAWING THE CHEST
To draw the chest, create a squareish shape but make the bottom part narrower than the top. The bottom of the second head marks the position where the nipples should be. This shape represents the rib cage, slimming down towards the waist and the belly. In females this is what creates the common hourglass figure. However, this transition is less noticeable in men, having a less curvy chest and waist. Keep this in mind while drawing to represent your character’s body structure more accurately.
DRAWING THE WAIST/BELLY
You need to draw a cylinder now, to represent the waist and the belly area. The line in between the fourth and the fifth head will determine the position of the crotch. It’s important that you leave enough space to fit the belly and the crotch in it.
Note: if you’re drawing a female character, I usually divide this cylinder in two sections, forming an hourglass shape. The top one becomes thinner as it gets closer to the waist and the bottom one becomes wider as it gets closer to the hips.
DRAWING THE CROTCH
Whenever I draw the crotch shape I can’t help but think of Barbie & Ken dolls. It amuses me greatly! You don’t have to go into much detail here drawing the whole pelvis. All you have to do is draw a shape similar to that of male or female underwear. Remember that female bodies usually have wider hips than male bodies.
DRAWING THE LEGS & KNEES
Draw an ellongated circle or vertical ellipse that goes from the bottom of the pelvis to the middle of the sixth head. Draw two circles in this position, they will represent the knees of your character.
Repeat the process for the lower part of the legs, extending them from the knees to the bottom of the seventh head.

DRAWING THE ANKLES
The ankles will be positioned at the bottom of the seventh head. But, unlike the rest of the joints we’ve done so far, don’t make them circular. The inner bones in the ankle are at a higher position than the outter ones. Create an elliptic shape with the inner sides at a higher position than the outter sides.
DRAWING THE FEET
To create the feet, draw a triangular shape starting from the middle of the ankle and becoming wider at the bottom.
DRAWING THE ARMS
All that is left now is to add the arms! Use circles to act as your character’s joints. Draw two circles at the top of the chest to represent the shoulders. The end of the rib cage marks the position of the elbows when standing still. Use that reference to measure and draw the arms with the right proportions! This will come in handy when you’re drawing dynamic poses and it’s not as easy to reference these imaginary reference points.
You may think it’s weird to draw the arms now, rather than earlier when you were drawing the chest. But I find it helps me position them better and be more accurate with the proportions. Needless to say, you’re more than welcome to draw the arms once you’ve drawn the chest if you prefer!
When standing still with the arms straight down, the wrists reach slightly below the crotch, with the hands reaching slightly above the middle of the thighs. We all know that’s not the most natural or common position to be in, but it can give you a good idea about the arms’ proportions. Keep that in mind to make sure you don’t draw overly long arms (unless you’re drawing Slenderman ;D).
DRAWING THE HANDS
We’ll talk about drawing hands in depth in a future post. But, for now, let’s cover the basic shape of the hands. Draw a squareish shape for the palm, but make the side with the fingers be slightly curved. Each finger will be divided into three small cylinders representing each phalange, except the thumb which only has two.
Bonus tips – Profile view in figure drawing
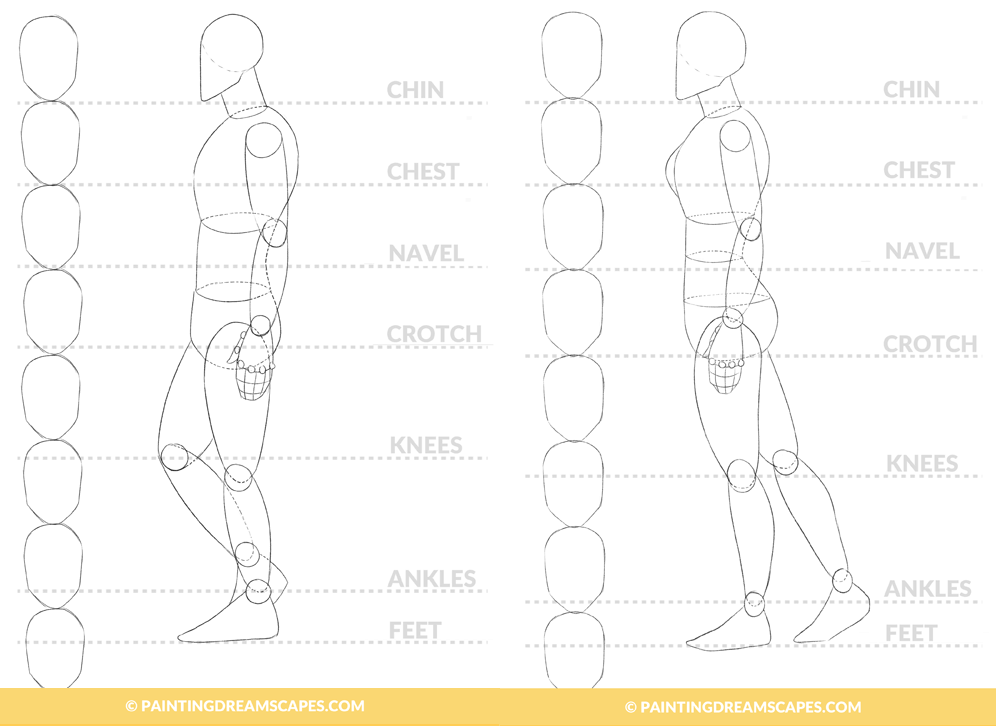
The same concepts apply when drawing figures viewed from the side. However, there are a few things that I’d like to go over, just in case!
- Remember that chests aren’t completely flat! The rib cage holds and protects many vital organs and that requires plenty of space. So, make sure to draw the front and the back of the chest/ribcage curved outwards.
- Observe the natural curve in the back formed by the spine. Females tend to be more curvy and have rounder features than males, but males still have curves that you need to account for. Mostly in the back, chest and glutes.
- Depending on how toned your character is, the arms, thighs and calves will be more muscular and you’ll need to pay attention to the shapes they create.
- The heels form a curve outwards from the ankle to the sole of the foot, not a straight line. Keep this in mind if you don’t want your characters to have weird feet.
Your Figure Drawing Challenge:
None of this will be of use if you don’t apply what you’ve learned here. So I want you to download these worksheets and practice figure drawing with them! Once you’ve completed them and drawn some more figures on your own, without help from my worksheets, email them to me! I’ll let you know if there’s anything important that you need to continue working on and I’ll keep track of your progress.
We’ll have a few challenges throughout the month where I’ll ask you to put what you’ve learnt here into practice. The ones that have progressed the most at the end of the month will receive a little gift!
Let’s work hard to become better artists!


I am trying to learn manga drawing, is there a good tutorial or website to learn anatomy and body proportions?
great valuable motion graphic knowledge
Thank you so much, Neelam!