One of the best things I did as an artist and that allowed me to start making some income from my art was starting my own Youtube channel for my speedpaints.
Youtube allowed me to rapidly grow my audience to 14,000 subscribers and reach more viewers than I could have ever imagined. I received thousands of views, incredibly kind comments from people who loved my art and I was able to build a community to call my own.
Today I’ll show you how to start a Youtube channel for your speedpaints. Are you ready?
This post contains affiliate links. This means, if you click these links and make a purchase, I may earn a commission from the sale at no extra cost to you. If you choose to make your purchases through my affiliate links, you’re helping me keep Painting Dreamscapes up and running! I only promote products & brands I love and use myself ♥
Why should you start a Youtube channel for your art?
You may be wondering “Why Youtube? Why not Instagram, Facebook, or some other platform?”. And the answer is pretty simple!
Youtube is a search engine. It’s like Google but for videos! This means that if you optimize your videos properly, they can be found at any time from here to eternity. Any video has the potential to go viral and the chances of that happening actually increase over time compared to platforms like Instagram or Facebook.
This quality makes Youtube a great platform to share your speedpaints and grow your audience in.
Step 1 - Setting up your account
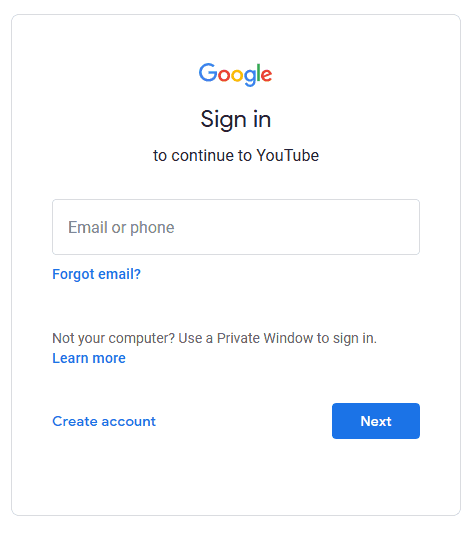
Alright! Let’s get to business. The first step is to create a Youtube account. To do that you want to click on the ‘Sign in’ button at the top right corner of the screen and you’ll be taken to a login page.
Here you can login with your Google account if you already have one and you want to use it for your channel. Or you can click on the link right below that says “Create account” and then choose “for me”.
Complete the steps to create your account and I’ll see you once you’re in! 🙂
Step 2 - Customizing your Youtube Channel
Now that you have your account ready to go, it’s time to customize it to fit your brand as an artist.
You’ll need:
2.1 Choosing Your Channel's Name
Important
Don’t choose a name you know you won’t like a couple of years from now. If you hit the Youtube jackpot and you grow an audience real fast, changing your channel’s name could result in you losing your verified checkmark for some time.
2.2 Choosing your Channel Icon
It’ll be your profile picture on your channel and will show in your main channel, but also under every video and alongside every comment or response you make.
Choose something that represents you and that could be appealing to people if they see it on someone else’s comment section, for example.
It needs to be an image file (no gifs allowed!) and be 800 x 800 pixels.
To update your icon, simply click on “Customize channel” and then hover over your icon and click on the pencil icon to edit it. You’ll be shown some steps to follow to upload your icon. Follow them and save your changes.
Ta-da! Your channel is now looking fab!
2.3 Customizing your Channel Art or Banner
This one is what makes or breaks your Youtube channel’s design so do your best to make it look like a great representation of yourself and your art.
For example, I wanted mine to represent my art and what my channel is about: my speedpaints. So in mine, I’ve created a collage of my best artworks and added a section in the middle featuring my channel’s name and the main topic “speedpaints”.
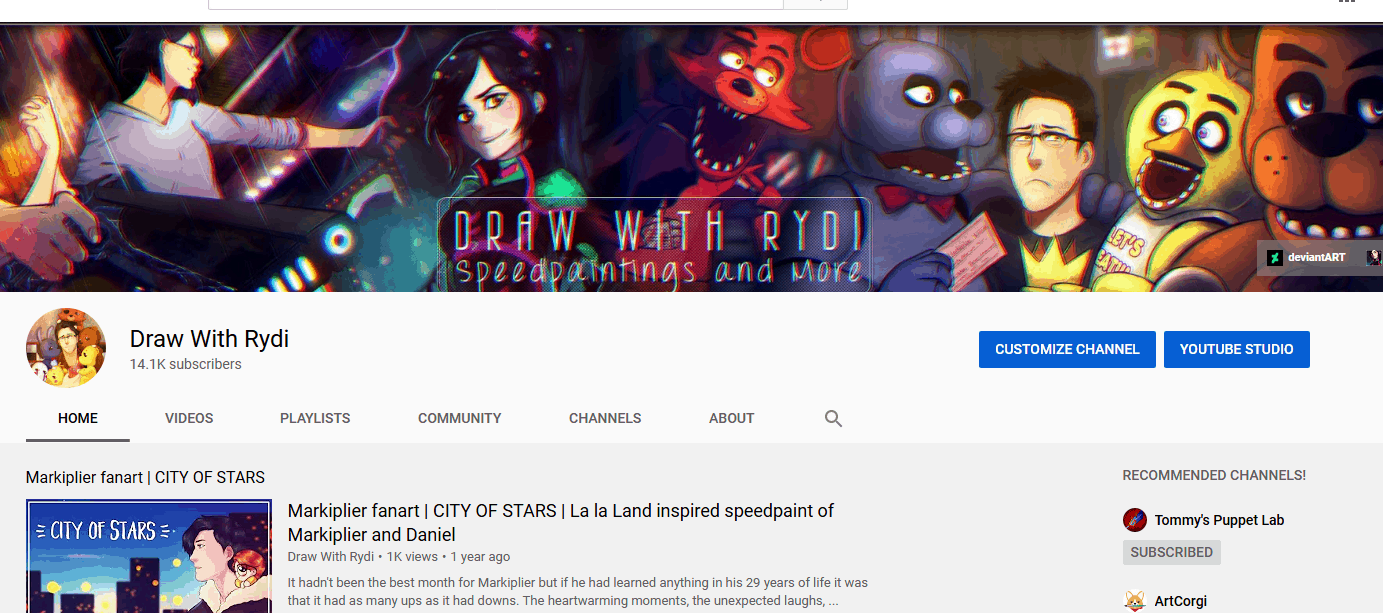
This way, anyone who stumbles upon my profile can tell what my content is about with just a glance.
You can create your own Youtube banner in Canva or in other image editing software like Photoshop or GIMP. The only thing to keep in mind is that the format is a bit odd.
The banner needs to fit different devices (mobiles, desktops, and even TVs!) so it will have a 2560 x 1440 px resolution but only part of it will actually show on most devices.
So you want to keep the most important sections in the middle of the image to ensure they will show even when they get cropped to fit the different devices.
You can download a banner template from this page (scroll down to the "Channel Art Template" section).
Once you’ve created your channel art, follow the same steps you did to change your icon but this time hover over the banner instead.

Step 3 - Creating your Speedpainting videos
Yay! Your channel is ready and now it’s time to start creating your speedpainting videos. Woo!
3.1 Materials and resources for speedpaint creation
In order to create speedpaints, you’re going to need the following equipment:
I personally record my screen using Camtasia’s screen recording tool, and then edit my videos with it as well. I’ve also been using Filmora to edit some of my videos* recently since it has a lot more fancy effects that I really enjoy using.
Filmora* is very affordable and only costs $69.99 for a lifetime license.
3.2 Creating a speedpaint basic overview
Step 1 - Record yourself as you’re painting or drawing.
Make sure to stop recording if you get distracted or need to check the internet. People don’t want to see how you browse the internet nor get access to your private information.
Step 2 - Edit Your Video
Load your recordings into your video editing software. Select all clips and speed them up until your total video duration is 10 minutes or under.
Crop out any unnecessary parts or sections where you’re showing your personal information or you’re browsing the internet in the recording.
Add a fitting royalty or copyright free song* you love and adjust it to fit the length of the video itself.
Step 3 - Export Your Video
Export your video as an .mp4 file or other format compatible with Youtube. Strive to select a format that keeps the quality of the video high, and preferably not below 1080p.
Yay! You’ve created your first speedpaint video. Congratulations!
step 4 - Optimizing Your Video for SEO
Now that your first speedpaint video is ready to go, you can upload it to Youtube and start optimizing it!
I’ve talked about SEO (Search Engine Optimization) on the blog in the past and how to use it to get your art noticed.
This is what you want to do with your videos to give them their best chance at being found in search result pages when people are browsing Youtube.
There are four main sections you need to optimize. Let’s take a look!
4.1 Craft the perfect video title
Your title needs to be appealing and pique the curiosity of people to make them want to click through to watch your video. I know there may not be a lot of mystery to a speedpaint, but try your best to make it interesting!
You also want to include relevant keywords related to the video to make it rank higher in search engines.
For example, when I create a speedpaint of the Fazbear family, I make sure to include the keywords “Markiplier”, “FNAF” or “Five Nights at Freddy’s” because I know those are the keywords people are looking for when they search for content like mine.
Using these keywords help my videos show up in search resutls and get more viewers for my speedpaints!
Important
Do not use keywords if they aren’t related to you video! This is a violation of Youtube’s community guidelines and in all honesty, it will just upset your viewers if you mislead them about what your video is actually about.
4.2 Nail your video description
Your video description is key to getting your speedpaint to show in search results. You want to create an appealing, keyword rich, conversational description that describes what the video is about.
If you do so using relevant keywords people are searching for, you’ll be able to tap into the pool of viewers searching for those keywords and you’ll grow much faster.
I like to create a story that goes along with my drawing and gives the viewer a closer insight on what’s happening in the piece and makes them connect to the artwork in a deeper way.
You can also use your description to link to other videos they may enjoy and to your social media platforms if you have any.
Finally, you can have a brief description of your channel so that they know what to expect from your channel and your content, and encourage them to subscribe.
Don't use clickbaity thumbnails. You want your channel to be honest and attract the right audience, not mislead the wrong people into checking out your content.
want to make a stable income from your art?
Enroll in my brand new mini course and learn the key to making a stable income from your art without overworking yourself or sacrificing all of your spare time.
Step 5 - Building the habit of Posting Regularly
Finally, now that you have a channel and know how to create and optimize your videos, the last ingredient is to build the habit of posting regularly.
Youtube values consistency and the more regularly you post, the more it will promote you to new viewers.
You want to post regularly on your channel and to do this, you’ll need to build a habit and set systems in place to guarantee you’ll always have content to post.
My recommended system for creating and sharing videos:
Your next steps to grow your channel
Woohoo! You’ve made a lot of progress today and you should now have a brand new Youtube channel for your speedpaints.
And soon you may be wondering “What’s next?”. Well, you want to continue posting regularly, responding to every comment you receive, posting comments on others’ channels and engaging with them to build a community.
Eventually you’ll be able to have a big channel and even monetize your account. Sweet, no?
If you want more tips on starting and growing your Youtube channel, be sure to register for my free training series “How to start a successful Youtube channel”.
Over to you - Do you plan to start your Youtube channel for speedpaints?
Today you learned how to start your Youtube channel, how to customize your icon and banner, how to create speedpaint videos, how to optimize your videos for SEO and how to master the habit of posting videos regularly.
Do you feel confident in creating your own Youtube channel? 🙂 Let me know in the comments below!
And if you want to visit my channel, you can do so here!
See you soon!

0 comments